Case Study: Shade Matching Fluorosis
Mark McKee CDT explores the science behind a shade match for Patient:
Melanie (Mel) Burian
Purpose
The purpose of this blog is to discuss the findings of research conducted by McTech in response to a shade match. In the field of Dental technology, much of our education is self-guided. In nearly all states, there is little to no oversight as to what a technician must know in order to produce restorations. This is for several reasons, of which we will not discuss here. The point is, as technicians, we must take it upon ourselves to be as informed as possible about the aspects of dentistry that we participate in. I often attend study groups with doctors whom I work with, as such it behooves me to be as informed as possible so I may contribute to the betterment of the dentistry practiced in my community.
For me, the reasons for stains found in teeth are a very relevant curiosity. Throughout my career I have been more concerned with the final outcome and have not studied the reasons why natural teeth develop discoloration, specifically fluorosis. Until now
Method
The research was conducted by my son Ryan McKee. Ryan has a Bachelors Degree in marketing and management and is our company photographer, marketer and R&D, among other things. Though he wears many hats, he is not a technician. Ryan came to McTech roughly two years ago and has developed a passion for the sciences behind dental restorations.
This is mostly a literature review focusing on two pieces found. After a long search, Ryan located a master thesis called “Classification of severe tooth discolorations and treatment options” by Lotte Jenssen and Huy Quoc Tran (1). This thesis was authored in 2011 and of the many journals, articles, and case studies he found, Ryan believes this to be most comprehensive summation of tooth staining. When Ryan Interviewed the doctor working on this case study, Dr. Taylor Baird, she emailed an additional resource called “Dental Fluorosis: Exposure, prevention and management” (2) that turned out to be very useful as well.
Anyone reading this with advice for Ryan on conducting future research of this kind or with further information on this subject please feel free to comment below or contact him.
Ryan and I are in no way attempting to establish guidelines or even make suggestions for diagnosis or treatment.
Defining Fluorosis:
The best way to define fluorosis is to examine what causes it. In a nut shell, fluorosis is cause by excessive ingestion of fluoride during enamel development. The amount of fluoride ingested during infancy is the prime factor in the presentation and severity of the condition. Sources of fluoride can come from many places such as water, supplements, milk, salt or oral care products. (1) A safe level for daily fluoride intake is between .05 to .07 mg F/Kg/Day. Most fluoride in drinking water in the US is maintained at these levels.(2)
Fluorides also occur in nature, though mostly in low quantities. Occasionally water sources such as wells can contain very high concentrations. A water source can transfer excessive fluoride into the soil, then into the vegetation which we eat, or into the vegetation cows eat who provide the milk we drink, and so on.
It is important to consider all sources of fluoride consumed collectively, including the water that is mixed with formula or the water the mother drinks when pregnant or breast feeding. Children exposed to excessive fluoride between 20 and 30 months are most prone to developing Fluorosis. (2)
Fluoride is highly reactive with mineralizing tissue and will incorporate itself into the crystal lattice structure. As stated before the amount of fluoride ingested marks the severity of fluorosis. These disturbances in the crystal lattice structure of the enamel are seen as thin, white, opaque lines corresponding to the perikymata running across the tooth surface. In this way the amount of fluoride exposure is reflected in the different layers of enamel. (1)
Classification of Fluorosis (1)
The classifications that discoloration of teeth will fall into has to do with the causes of the discoloration. The first main distinction between the different causes are divided into three classifications: intrinsic, extrinsic and Internalized.
Extrinsic discoloration: The discoloration is on the tooth surface or in the acquired pellicle. Fluorosis is not included under this classification.
Internalized discoloration: This is further classified into developmental and acquired defects. Though Fluorosis falls under the developmental category, internalized discoloration involves only extrinsic staining and thus fluorosis does not meet the qualifications for this classification.
Intrinsic discoloration: “the structural composition of thickness of the dental hard tissue is changed” (1). Intrinsic discoloration is then classified into either systemic or local causes. Systemic causes are further classified as either genetic defects or drug induced.
Because Fluorosis effects the composition of the hard tissue it is classified first as intrinsic. Because the condition effects the entire mouth, fluorosis then falls under the systemic category. Lastly, because Fluorosis is due to excessive ingestion of fluoride during development it is then classified as drug induced.
In summation, Fluorosis is a drug induced, systemic, intrinsic discoloration.
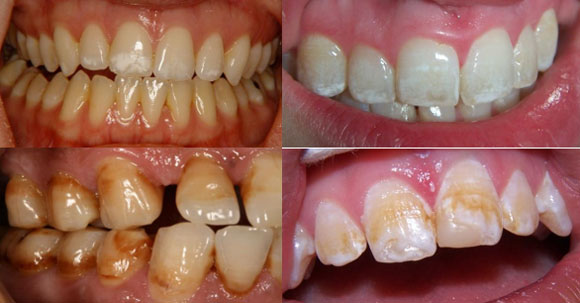
Fluorosis. Clinical Photos from Catarina Wallman.
TF Score (1)
The severity of fluorosis is classified according to the “Thylstrup Fejerskov Index”
- Score 0 - The normal translucency of the glossy creamy-white enamel remains after wiping and drying of the surface.
- Score 1 - Thin white lines are seen running across the tooth surface. Such lines are found on all parts of the surface. The lines correspond to the position of the perikymata. In some cases, a slight 'snow capping' of the cusps/incisal edges may also be seen.
- Score 2 - The opaque white lines are more pronounced and frequently merge to form small cloudy areas scattered over the whole surface. 'Snow capping' of the incisal edges and cusp tips is common.
- Score 3 - Merging of the white lines occurs, and cloudy areas of opacity occur spread over many parts of the surface. In between the cloudy areas, white lines can also be seen.
- Score 4 – The Entire surface exhibits a marked opacity, or appears chalky white. Parts of the surface exposed to attrition or wear appear to be less affected.
- Score 5 - The entire surface is opaque, and there are round pits (focal loss of the outermost enamel) that are less than 2 mm in diameter.
- Score 6 - The small pits may frequently be seen merging in the opaque enamel to form bands that are less than 2 mm in vertical height. These cases also include surfaces where cuspal and facial enamel has chipped off, and the vertical dimension of the resulting damage is less than 2 mm.
- Score 7 – There is a loss of the outermost enamel in irregular areas, and less than half the surface is so involved. The remaining intact enamel is opaque.
- Score 8 - The loss of the outermost enamel involves more than half the enamel. The remaining intact enamel is opaque.
- Score 9 - The loss of the major part of the outer enamel result in a change of the anatomical shape of the surface/tooth. A cervical rim of opaque enamel is often noted (1)
The Case
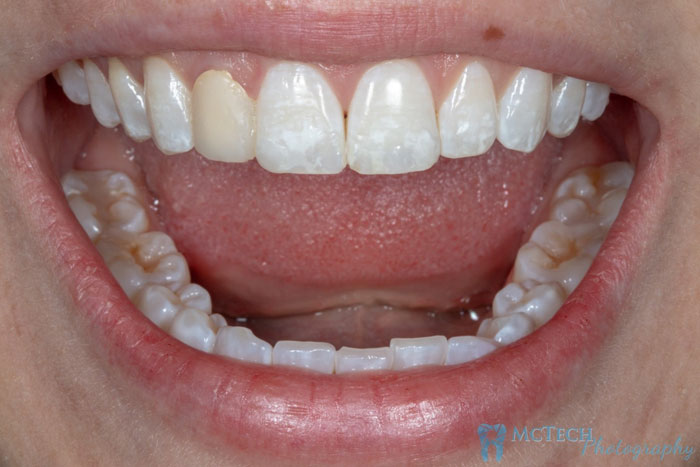
The Doctor working on this case was Dr. Taylor Baird of Turley Dental Care, you can read more about her and her practice by clicking this link https://www.turleydentalcare.com/meet-us/meet-our-doctors/ . Ryan Called Dr. Baird to ask for more details about the case and she came to McTech herself. Dr. Baird said that the patient (Melanie (Mel) Burian) initially scheduled due to the failure of a previous direct restoration for #7. She shared a picture (fig. b) and explained that the patient had been born with a single peg lateral on #7. At some point a previous doctor had used composite to build it up into a matching size and length as #10. Patient chipped that and the mesial corner of #8. As you can see (fig. c), underneath the composite is the still healthy enamel.
Ryan and I, after reading about the classifications of Fluorosis, put Mel’s case as a TF2 or 3. When asked what classification she would put Mel under, Dr. Baird said “Pretty much the fluorosis strengthens teeth to prevent decay, but when you start getting more severe fluorosis (like types TF4 and 5), there is pitting on the teeth which are more prone to picking up stain. In Mel's case, I don't think she's more than a TF2 classification. Her fluorosis with the mottling doesn't affect the structure enough to pick up staining, but it will not whiten at the same rate for whitening procedures.”
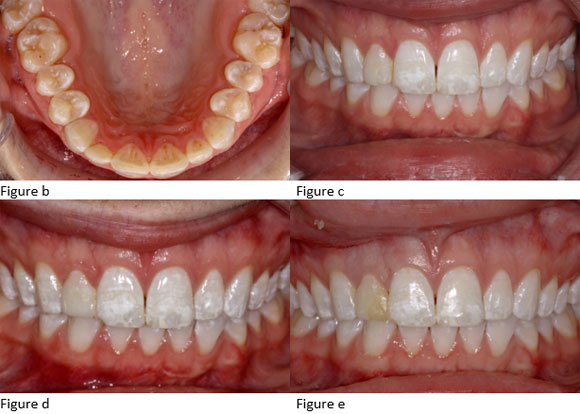
Dr. Baird discussed treatment options with the patient, breaking options into short term and long term. The short-term option involved basically repeating the same treatment that was given before, using composite to build up the tooth structure. Mostly because of insurance concerns the patient decided to go with this option. The Dr. explained to the patient that this could result in a similar outcome, that composite restorations were prone to exactly this kind of failure and had aesthetic limits. Dr. Baird gave us a photo of her after composite work (Fig. d).
Ryan asked about how challenging the composite work was for this case. Dr. Baird said she was happy with it but was excited for some upcoming courses on doing exactly this kind of work. A few weeks later however the patient was back. The composite had discolored (fig. e) and this time the patient chose to go with the long-term treatment option, a crown. Dr. Baird prepped, temped, and sent the case, the patient, and some photos (figs. f & g are two of these) to the lab.
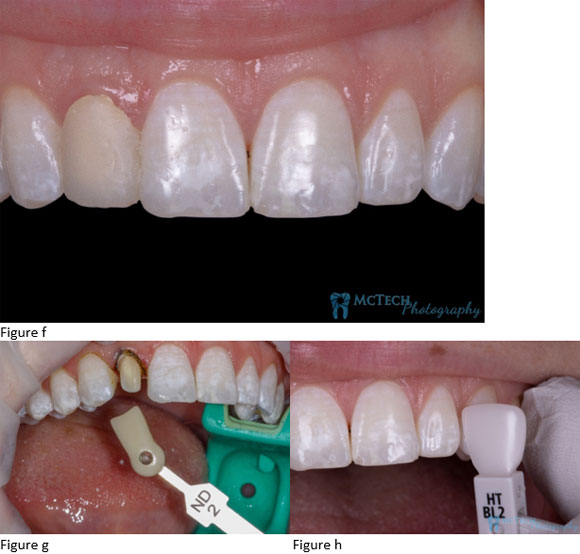
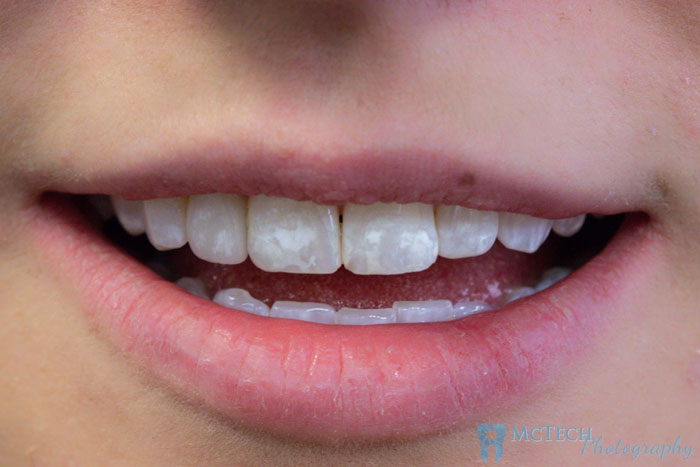
On Sept. 6, 2018, patient Mel presented to us for a shade match of Lateral incisor #7 to #10. Immediately I noticed the systemic white staining. I soon realized the base shade of her natural teeth should not be difficult to match. Although, we all know the hardest thing we do with color in dentistry is to match a single anterior crown to natural teeth. Mel presented with obvious fluorosis, which has its own set of difficulties. Fluorosis can show in several different ways. Common among these are:
- Random, opaque, white patches – like with Mel
- White highlights on peaks and ridges
- White striations-horizontal, vertical, straight or wavy
The patient confirmed that she had been diagnosed during childhood with fluorosis. She mentioned living on well water and seemed not to have a problem with the stains at all.
In an aesthetic case such as this, the treatment plan a Dr. chooses is heavily predicated by the attitude of the patient. Fluorosis is a systemic condition meaning that while the white spots that cover the tooth may not be Ideal, the fact is, all the teeth in the mouth are equally stained. Uniformity is a basic law of aesthetics. Many of the patient’s family members share the same condition and she doesn’t necessarily find a problem with it. When she came to us for a shade match she expressed as much. She felt the fluorosis “gave her smile character.”
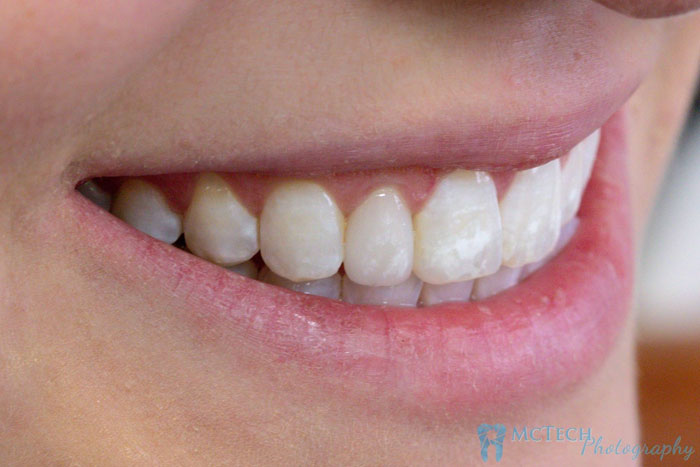
I find that the most difficult part of matching fluorosis is duplicating the intensity, opacity and sometimes even the thickness. With all of these factors, I was glad she was able to come to the lab so I could see her, take my notes and Ryan and I could take our own photos. (fig. h is one of these)
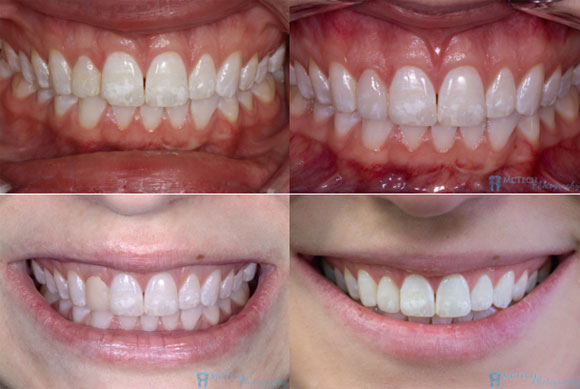
Dr. Baird reported that both she and the patient –Mel were very happy with the results.
As an Aesthetic technician I am also happy with the final outcome. When I am fortunate enough to see my work in someone’s mouth, I tend to look for ways I could have improved the crown. I think this is a trait our industry shares. Mel’s case truly did turn out very nice. I am pleased with the match.
Materials used:
- e.max press – monolithic
- Empress universal stains and glaze

Custom shades have always been limited to local labs because of access to the patient. Photography is helpful, but even with shade tabs in the photo it is difficult to determine the correct shade. Especially, the correct value of that shade. As technology progresses, photography is becoming a more viable option for long distance shade mapping. We are researching photography equipment, techniques and software which have wonderful claims to help with these things. Hopefully they are as advertised. We’ll let you know.
Authored by Ryan McKee, Edited by Mark McKee CDT
Sources
(1)
Jenssen, Lotte. “Classification of severe tooth discolorations and treatment options.” (2011).
(2)
Alvarez, J. A., Rezende, K. M. P. C., Marocho, S. M. S., Alves, F. B., Celiberti, P., & Ciamponi, A. L. (2009). Dental fluorosis: exposure, prevention and management. J Clin Exp Dent, 1(1), 14-18.
The big question is always, can this be treated with bleaching? Check out what I found.
Treating fluorosis with bleaching sources:
http://www.dentistrytoday.com/aesthetics/deep-bleaching-techniques/970-
Blog Post Author
Mark McKee
